I am a Primary Science teacher in Perth Australia. I enjoy developing resources for my students that encourage hands on inquiry and investigation. I would like to see my students develop a life long passion for Science and to become active advocates at conserving and protecting the Earth's precious resources.
I am a Primary Science teacher in Perth Australia. I enjoy developing resources for my students that encourage hands on inquiry and investigation. I would like to see my students develop a life long passion for Science and to become active advocates at conserving and protecting the Earth's precious resources.
This is a Frog Quiz to be used at the end of a unit or topic on frogs. All the images are of frogs in the Perth region. Perth in Western Australia. However, the quiz could be used to review frogs in any part of the world. Students work in teams to write their answers.
This activity template could be used for research on any Australian animal. It is a digital learning activity. The file was shared with each student via Google Drive but could be shared using whatever other digital learning platform that you use at your school. The students had to choose one of the informational sites from this my own website designed by Crickcrick herself!
http://thescienceworkshop.weebly.com/bandicoot.html
They then had to sort the information into the four text boxes on their digital learning file. The students had to describe a bandicoot, list possible threats, describe a bandicoot habitat and list the foods that a bandicoot eats.
the students had the choice to upload their own photo of a bandicoot or use the one on the file.
This worksheet activity guides the students through three weathering and erosion investigation activities. In the first activity this students are given a half cup of frozen water. The teacher will need to set this up the day before. Each team or pair of students will require a cup of frozen water. They will compare and make observations about a glacier freezing and melting. In the second investigation each team of pair of students is given a small container containing three sugar cubes. By shaking the container the students simulate wind. Particles of sugar will gather in the container. This is the wind weathering rocks. In the third investigation the students are given a small piece of chalk and a container with vinegar and a pipette. The slowly add drop of vinegar to the chalk and observe the changes. This is ‘acid rain’. There are a few photos on the second page and the students identify what type of weathering is happening in each one.
This worksheet guides students as they work in teams to investigate the different properties of rocks. Each team is given a rock and worksheet. You will need th following materials to conduct the tests
magnifiers
digital scales
tape measure
water and pipette
scissors
torch
vinegar and eye dropper
This is a design activity with the final goal making a set of shoes made from a variety of everyday materials.
The students will test the following materials in this investigation.
wood
plastic
sponge
fabric
cardboard
There are 4 tests for the students to conduct.
Investigation 1 - Heating and cooling
Test each material by holding it against different surfaces for 1 minute and recording findings in a table.
Investigation 2 -Friction
Rub the material against different surfaces such as carpet, grass and paving for 1 minute to see if there is an effect on the material.
Investigation 3 - Force
Set a timer for 1 minute while standing on the material. Describe the material after standing on it.
Investigation 4 - Water
Immerse the material in water for 1 minute and recording findings in a table.
To conclude the investigation the students share their findings and decide on the best materials to use to make their set of shoes.
This investigation is a lot of fun for young children.
You will need one old CD rom or DVD for each child.
Take the children outside on a sunny day. If you’re in Australia make sure that the children are wearing hats. LOL No hat no play!
Locate the Sun. Make sure that the children are standing in the full Sun.
The idea is to capture the sunlight by angling the CD rom or DVD and then shining the light into a shaded area.
I had the children stand on the oval and then shine the light onto the school’s ‘undercover’ area. There were plenty of objects like benches and bins for the children to shine their light. The area I chose also had plenty of people coming and going so the children were able to shine their light onto them.
This activity can be a be tricky and you will find many children saying ‘mine doesn’t work’.
To conclude and to ensure that every child can shine a sunbeam, I asked small groups of children to stand in the shaded undercover area while the reminder of the class sone a ‘disco’ onto them.
We then returned to class and I demonstrated on the whiteboard how to draw a ray diagram to show how light travelled from the Sun to the DVD or CD rom and then onto an object or person.
On the worksheet the children can draw themselves holding the CD rom or DVD and the object/person that they shone light onto. They can add ray arrows to show how light travelled. And finally write their own sentence about the investigation.
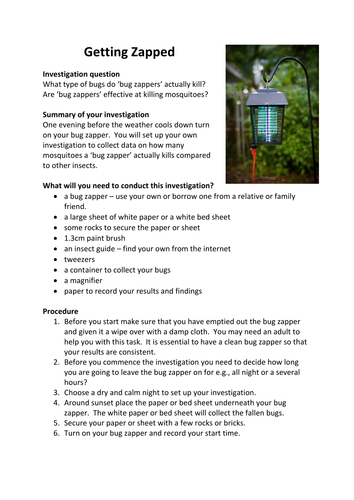
Students set up a bug zapper in the evening at their own home to conduct their own 'fair test'. All the information you need is explained on the word document - investigation question, materials, procedure, analysing and explaining the results and extension ideas.
TIn this package you will find - a worksheet and an assessment rubric. To conduct this investigation you will need to collect several metal coat hangers and tie string to two ends of the coat hanger. Place students into teams of two. Each team has a set of materials to test using their coat hanger. The strings on the coat hanger are ‘draped’ around the students ears. This is how the student will pick up and sense the vibration. The student use the worksheet to record their findings. Each student will ‘tap’ a selection of materials onto the wire of the coat hanger and the other student will indicate if they sense the vibration.
This is a powerpoint to guide students through an individual investigation where they explore their nervous system. To conduct the investigation the students will need
one pin
1 paper clip
ice
a polystyrene cup
hot water
a fine tipped black texta
a piece of 1cm grid paper
The students will use a black pen to draw and 1cm grid on the back of their hand. In this grid they will use different materials to test out their sense responses. The students will make a duplicate grid on a piece of 1cm graph or grid paper. On this piece of paper they will record their responses using codes.
The final slide in this resource includes discussion questions.
This erosion investigation can be carried out in the school sand pit to investigate the effects of water on sand. Students can investigate what happens to a sandcastle when they pour differing amounts of water onto it.
The powerpoint details the steps required for students to conduct their investigation. Students use the 'investigation planner' to determine variables and record their measurements and findings.
To use this resource firstly print off slides 2- 12. There are 10 stations. You will need to provide the materials at each station for the students complete the investigations.
Here is what you need to prepare
Slide 2 Iron filings and sand - in a tray add sand and a few spoons of iron filings. Students use a magnet to collect the iron filings.
Slide 3 Fizzing tablet and water - glass of water and a fizzing tablet such as Aspro Clear.
Slide 4 Inflate a balloon with vinegar - bottle, measuring cups, funnels, balloon, vinegar, bicarb soda.
Slide 5 Glowsticks - 2 glow sticks, 2 large beakers, 2 thermometers, 2 pieces of black card, icy cold water from the fridge, hot water from a kettle.
Slide 5 Burning candle - candle, large glass jar, matches.
Slide 6 Autumn leaves - a tray of autumn leaves, crayons, lithograph paper
Slide 7 Melting ice investigation - 2 petri dishes, ice cubes, salt, measuring spoons.
Slide 8 Milk and lemon juice - lemon juice, pipette, milk, glass beaker.
Slide 9 Investigating nails - 2 trays of nails (rusted and not rusted).
Slide 10 Plasticine - various colours of plasticine.
Slide 11 Chalk - various colours of chalk, paper
Print the recording sheet on Slide 12. Or you can purchase the recording sheet as a seperate product from my store.
Allocate the students to the different stations and allow them to complete the investigation and record their findings on the worksheet.
Gather students together to share findings.
If you have time rotate students to another station.
Gather students together and conclude by sharing the Conclusions on the PowerPoint.
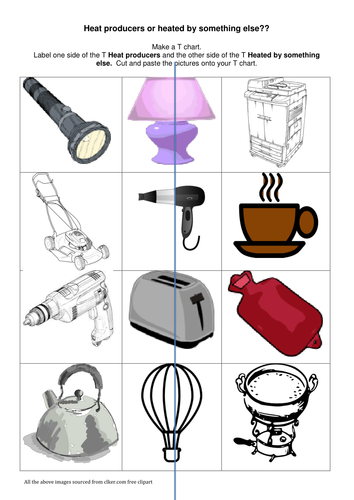
Heat producers or heated by something else??
This lesson package includes
1. A powerpoint presentation to identify and discuss with students when an object producers it's own heat or is heated by something else.
2. A hands on team investigation to identify various heat sources set up around the classroom using objects sourced in the classroom or brought in by the students or class teacher.
3. This task is the assessment component. Students need to identify images that produce their own heat and images that are heated by something else and sort them onto their T chart.
4. An assessment rubric to accompany the worksheet component.
This is an interactive investigation where the students are taken to a bushland setting in Perth Western Australia or have access to a bushland area on their school site. The students use the worksheet to guide their investigation about the Nyoongar season of
Kambarang which occurs in October/November
Djeran which occurs in March/April
Makuru which occurs in June/July
Djilba which occurs in August/September
There are several Nyoongar Six Season posters that can be purchased or found online. I purchased mine from SERCUL in Beckenham.
I do not have a worksheet for Birak. This season is over the Jaunary/December period and Australian students are on their summer holidays at this time.
Students were shown different materials buried in a ‘see-through compost container’. The materials in the container were - a banana skin, plastic knife and paper egg carton. Students then engaged in a discussion about how long it would take the different materials to rot. The students then conducted their own investigation. Students chose one material either; fruit or vegetable scrap, plastic, paper or Chux cloth. Students placed their material in the bottom of a round take away container then covered the material with potting mix. A few weeks later the students uncovered their material and recorded their findings on the worksheet.
Resource also includes an assessment rubric.
This is a detailed powerpoint on how to guide your students to make a ‘circuit’ bug. A circuit bug is an electronic/craft project using LED lights, a 3V disc battery, a peg, copper wire and pipe cleaners. Once the students have created their circuit they can work creatively to make a bug/minibeast. The possibilities are endless. The final slide in the powerpoint is a a set of review questions for the students to evaluate their learning experience.
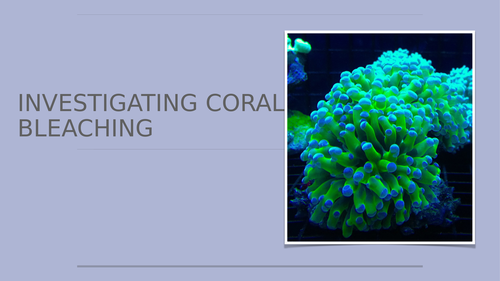
This is a powerpoint, youtube clip and worksheet that explains to students how to set up a fair test to investigate coral bleaching. Students will take two marine shells, weigh each shell then place one shell in a bowl of tap water and the other shell in a bowl of vinegar. Over the next week the students make observations and record the changes to each shell. There is also a worksheet to accompany this powerpoint. The worksheet is called ‘Investigating Coral Bleaching student worksheet’ . The students will make their own conclusions about the effect of Carbon Emissions on our coral reef ecosystems. The worksheet can be adjusted so that the investigation runs over a sorter period eg, one week.
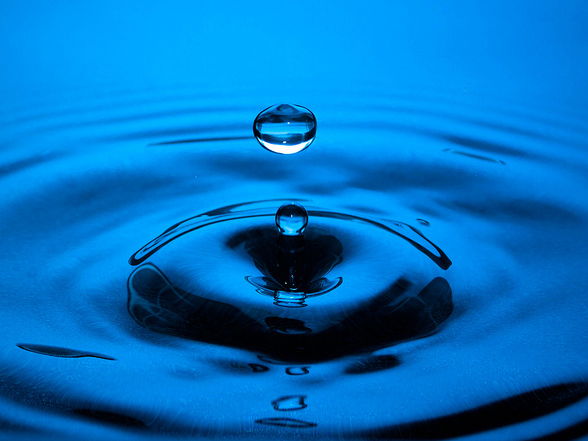
This resource includes a powerpoint presentation to guide students as they investigate water with their fives senses. Some of the activities include shining a torch onto the cup of water and dropping a marble into the cup of water.
Included is a worksheet for the students to record their findings about water.
This is a powerpoint to guide students to conduct their own research about a volcano.
The students can create their own powerpoint or Keynote and use the information on the slides to guide their research. The information on the slides include
Volcano name and location
Which country and continent is volcano?
Type of volcano and number of eruptions over the past 500 years.
Closest city and population
Distance closest city is from volcano and date of last eruption
The students investigate how many how metal objects it would take to change the temperature of a cup of water. The students work in their cooperative teams to make a prediction and set up a fair test investigation by measuring the temperature of the water before and after placing hot metals objects into the cup. The students evaluate the investigation by concluding whether the hot metal pieces are heat producers or heated by something else. To conduct this investigation the students will need a thermometer, tongs to pick up the hot bolts, a timer, a polystyrene cup and several hot bolts from a hardware store. The bolts need to be placed in the sun to heat up prior to the lesson. This resource includes a PowerPoint presentation explaining how to conduct the investigation, an accompanying worksheet to record findings and an assessment rubric.
This is an exciting lesson. I was able to set up a night activation camera in the hollow of a tree inhabited by a family of Southern Boobook Owls. Southern Booboook Owls live in Western Australia and they are the smallest owl on the Australian continent. These movies can be used to show the behaviours of any owl species. There are six owl movies.
Movie 1 - the baby owlet rotates it’s head/neck 180.
Movie 2 - the adult owl delivers a mouse to the owlets in the hollow.
Movie 3 - the adult owl delivers an invertebrate (possibly a moth)
Movie 4 - the adult owl delivers another invertebrate.
Movie 5 - an adult owl enters the hollow.
Movie 6 - a second adult owl enters the hollow.
Here is link to the owl movies that have been uploaded onto my website.
https://thescienceworkshop.weebly.com/southern-boobook-owls.html
Use the accompanying worksheet to guide students as they view each movie. Students record what the owls are doing, what they eat and what goes on in an owl hollow in the middle of the night. It’s very busy!!